In the time it took you to read this, light went around the Earth at least 10x. 

I Am Graphics And So Can You :: Part 5 :: Your Pixels Are Served

I Am Graphics And So Can You :: Part 5 :: Your Pixels Are Served

There they go... draw calls piling into a command buffer; waiting to be pushed in batch to their next stage in the pipeline.  When you call draw, you're not actually invoking anything on the GPU directly.  Instead you're recording things to a command buffer which will later be submitted.  The GPU is very good at what it does, but it's too busy to stand around and have a conversation with just you.  

Remember my restaurant analogy a couple posts back?  The CPU would be akin to the server writing your order down into a small buffer.  When you say you're done and want to submit your order, the server then takes that back to the kitchen; which in this analogy is the GPU.  The GPU is setup to produce orders as quickly and efficiently as possible.  

In Part 4.5 we discussed how and where idTech invokes draw calls and we stopped just short of diving into the Vulkan specific parts.  So let's order us up some pixels!  It only takes a few simple steps.

  1. Start a frame
  2. Record draw calls
  3. End a frame
  4. Submit to GPU
  5. Wait for work to be done, then show to user.

In restaurant parlance this would be...

  1. Server pulls out pad and pen.
  2. Server writes down your order.
  3. Server finishes taking your order.
  4. Server takes order to the kitchen.
  5. Server waits for food to be done, then brings it to you.

In code this will be...

  1. GL_StartFrame
  2. DrawView, CopyRender, PostProcess
  3. GL_EndFrame
  4. vkQueueSubmit ( Also in GL_EndFrame )
  5. BlockingSwapBuffers


Start A Frame

Let's order us up some pixels!  

Let's order us up some pixels!  

 
/*
==================
idRenderBackend::GL_StartFrame
==================
*/
void idRenderBackend::GL_StartFrame() {
	// Grab an image off the swapchain that we can draw into.
	ID_VK_CHECK( vkAcquireNextImageKHR(
		// The logical device and swapchain we setup in Part3.
		vkcontext.device,
		vkcontext.swapchain, 
		// Wait indefinitely for an image. Anything less is measured in nanoseconds.
		UINT64_MAX, 
		// A semaphore to signal when the image is acquired.
		vkcontext.acquireSemaphores[ vkcontext.currentFrameData ], 
		// Not using a fence
		VK_NULL_HANDLE, 
		// We'll get back the index of the swap chain image we can use.
		&vkcontext.currentSwapIndex ) );

	// If we previously freed any images or memory while the 
	// objects were in flight, then go ahead and clean them up now.
	idImage::EmptyGarbage();
	vulkanAllocator.EmptyGarbage();

	// Flush any outstanding device local allocations to the device.
	stagingManager.Flush();

	// We'll cover this in an upcoming pipelines article.
	renderProgManager.StartFrame();

	// Get the command buffer ready.  To start recording a command buffer,
	// we always need to call vkBeginCommandBuffer.
	VkCommandBufferBeginInfo commandBufferBeginInfo = {};
	commandBufferBeginInfo.sType = VK_STRUCTURE_TYPE_COMMAND_BUFFER_BEGIN_INFO;
	ID_VK_CHECK( vkBeginCommandBuffer( vkcontext.commandBuffer[ vkcontext.currentFrameData ], &commandBufferBeginInfo ) );

	{
		// Phew... ok, this gets a bit hairy. 
		// I'll explain it outside the code block.
		VkMemoryBarrier barrier = {};
		barrier.sType = VK_STRUCTURE_TYPE_MEMORY_BARRIER;
		barrier.srcAccessMask = VK_ACCESS_HOST_WRITE_BIT;
		barrier.dstAccessMask = 
			VK_ACCESS_INDEX_READ_BIT |
			VK_ACCESS_VERTEX_ATTRIBUTE_READ_BIT | 
			VK_ACCESS_UNIFORM_READ_BIT |
			VK_ACCESS_SHADER_READ_BIT |
			VK_ACCESS_SHADER_WRITE_BIT |
			VK_ACCESS_TRANSFER_READ_BIT |
			VK_ACCESS_TRANSFER_WRITE_BIT;

		vkCmdPipelineBarrier( 
			vkcontext.commandBuffer[ vkcontext.currentFrameData ], 
			VK_PIPELINE_STAGE_ALL_COMMANDS_BIT,
			VK_PIPELINE_STAGE_ALL_COMMANDS_BIT, 
			0, 1, &barrier, 0, NULL, 0, NULL );
	}

	// Renderpasses can handle clearing attachments.  
	// Here I'm supplying a color, depth, and stencil clear value.
	const uint32 numClears = 2;
	VkClearValue clearValues[ numClears ];
	clearValues[ 0 ].color = { { 0.0f, 0.721f, 1.0f, 1.0f } };
	clearValues[ 1 ].depthStencil = { 1.0f, 128 };

	// Just like with command buffers, we have to "begin" a renderpass, 
	// before we can do any drawing.
	VkRenderPassBeginInfo renderPassBeginInfo = {};
	renderPassBeginInfo.sType = VK_STRUCTURE_TYPE_RENDER_PASS_BEGIN_INFO;
	// Our lone renderpass
	renderPassBeginInfo.renderPass = vkcontext.renderPass;
	// The frame buffer associated with the swapchain image
	renderPassBeginInfo.framebuffer = vkcontext.frameBuffers[ vkcontext.currentSwapIndex ];
	// The area of the swapchain image
	renderPassBeginInfo.renderArea.extent = vkcontext.swapchainExtent;
	// The clear values we just setup.
	renderPassBeginInfo.clearValueCount = numClears;
	renderPassBeginInfo.pClearValues = clearValues;

	vkCmdBeginRenderPass( vkcontext.commandBuffer[ vkcontext.currentFrameData ], &renderPassBeginInfo, VK_SUBPASS_CONTENTS_INLINE );
}
 

So a lot of unsurprising things, and then something kinda scary for beginners.  ( pipeline barriers ).  Don't worry, it'll all make sense in a bit.  But first let's talk about the unsurprising things.

  1. vkAcquireNextImageKHR - We just get the swapchain image we'll be rendering our frame into.
  2. Resolve any memory operations that were deferred.  This includes image / memory deletions or staged allocations.  
  3. vkBeginCommandBuffer - We open the command buffer so we can begin recording things into it.
  4. vkCmdBeginRenderPass - We open the renderpass so we can begin drawing to its attachment(s).  Notice the command buffer we opened is passed to the function as the first parameter.  Also note the call begins with vkCmd.  This is a very common idiom for functions recording things to a command buffer.

So now for the scary bit.

Pipeline Barriers

We briefly touched on pipeline barriers in image allocations.  But it was easy to "hand wave" them away as just transitioning the image layouts.  Now we're forced to answer a more fundamental question about what it is doing.  One of the core differences of Vulkan from earlier graphics APIs is that you have to provide your own synchronization when accessing data.  

So before I dive into explaining pipeline barriers, I'll give you the short answer.  They help you keep your memory consistent by avoiding three deadly hazards.

Let's go back to our restaurant analogy.  In this case pipeline barriers actually apply to what's going on in the kitchen.  This is because in essence the kitchen is a pipeline.  It has stages of food prep and delivery.  If anyone messes up at any stage then someone's order can come out wrong, and we've all been there.  Let's setup a fake kitchen and examine how pipeline barriers save your meal.

 
gfx-kitchen.jpg
 

Here's our kitchen, and a quaint little restaurant.  We've already got two customers!  One is vegetarian ( denoted by a green circle ) and one is meat-eating ( denoted by a red circle ).  Obviously vegetarians would be rather displeased if their meal showed up with meat on it.  And someone ordering a dish containing meat would be displeased to not receive such.   

So there's a rather nice comparison already to a discrete GPU setup.  Let's look at that real quick.  


Although in reality the GPU would look more like this.


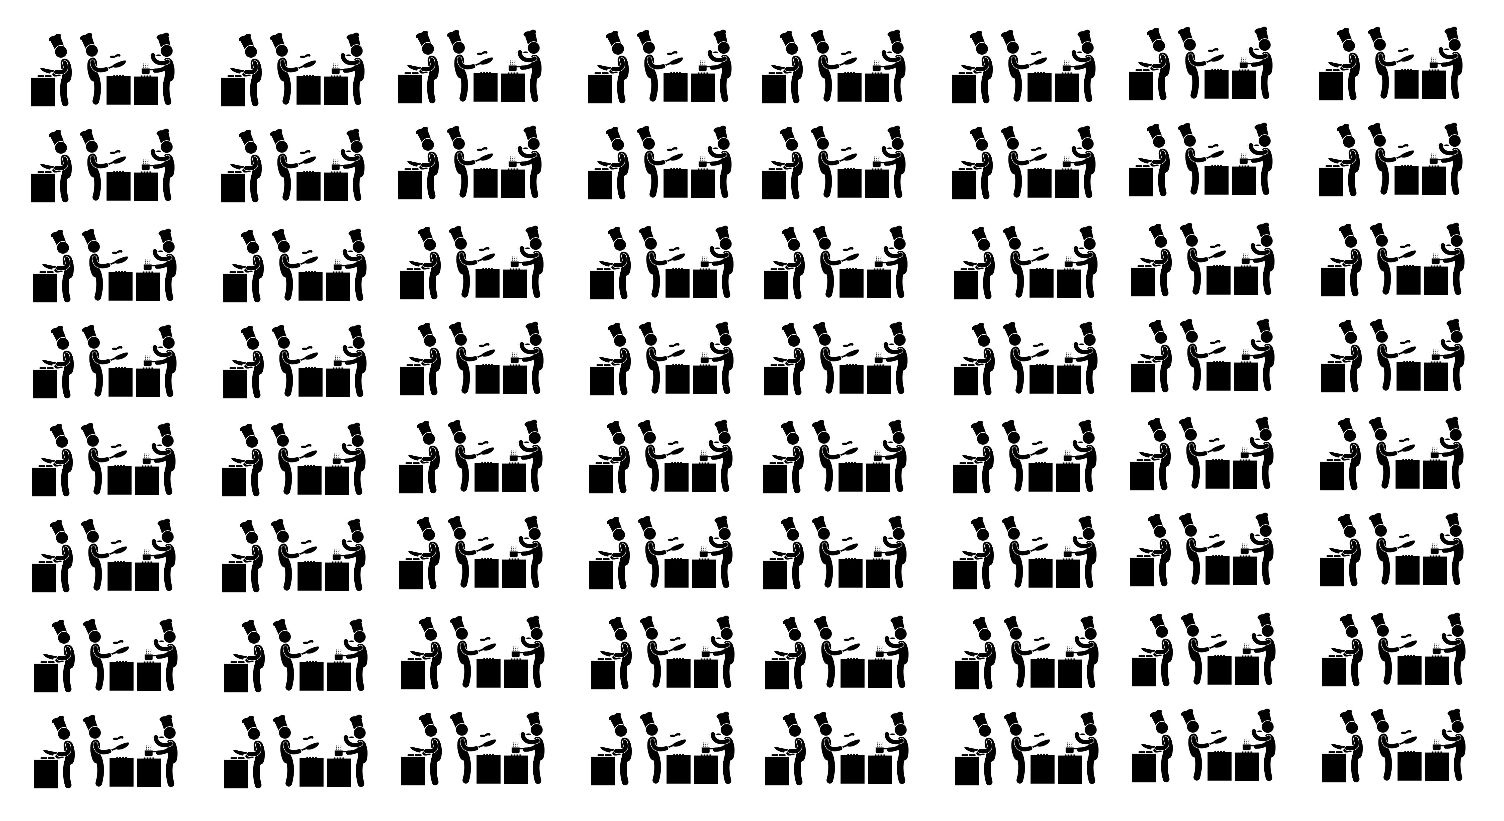
Now in our restaurant things are rather simple.  There's always a vegetarian table making a vegetarian order, and there's always a non-vegetarian table ordering non-vegetarian things.  Their hunger is never satiated so they just order the same thing over and over again.  The vegetarian order always gets submitted before the non-vegetarian one.  The kitchen is composed of three stages.

  • Prep Stage - Prepares the same ingredients for an order no matter what.
  • Line Stage - Cooks either the vegetarian or non-vegetarian main course.
  • Expediter Stage - Puts the dish together and gives it back to the server.

Let's walk through how the kitchen handles orders without any problems.

correct-pipeline.JPG

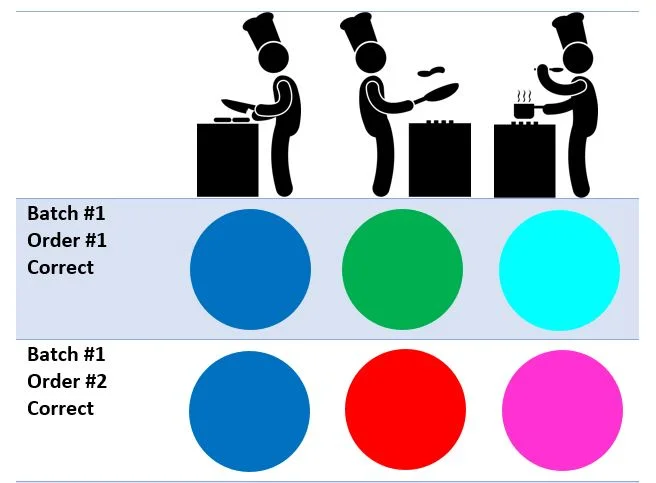
Let's examine how our kitchen functions under ideal conditions.  The prep stage always prepares garnish ingredients that go on our food no matter veg/non-veg.  This is represented by blue.  The line stage cooks either veg/non-veg, represented by green and red.  The expediter stage mixes the ingredients to show a final outcome matching what the recipe should produce ( cyan = veg dish, magenta = non-veg ).  Remember that veg orders are submitted first so blue shaded rows should always have cyan as a result.  White shaded rows ( even orders ) are non-veg and should have magenta as a result.  Now let's look at some problems that can occur in the pipeline.


Read-After-Write

Oops!  The kitchen just gave someone a vegetarian dish when they didn't order it.  What happened?  In this case they got the first order right.  But on the second one the expediter READ from the line stage before the line had a chance to WRITE red.  That means they got the old ingredients.  Most modern hardware ( and GPUs in particular ) are highly concurrent.  But as experienced hands can tell you, this often leads to unexpected side effects if not managed properly.  Sometimes we need to guarantee order of operations.  This is essentially what pipeline barriers help with. 


Write-After-Read

This next hazard is very similar to the first, it's just reversed.  Instead of the READ happening before the WRITE, the WRITE beats out the READ when we don't want it to.

raw-case2.JPG

This kitchen is just falling apart.  What mess have they gotten into now?  Well what happened is that the orders overlapped to where the line stage wrote before the expediter had a chance to read.  This resulted in two non-veg dishes.  


Write-After-Write

Now for the final hazard that can befall our kitchen.  We'll need to expand our pipeline a bit to demonstrate this one.  Say we add a grill stage after the line stage.  The grill only works on results of the line stage.  ( Grilled results are teal = grilled veg and purple = grilled non-veg )

waw-case5-6.JPG

Well at least prep continues to do their job right.  What mess are we into now?  Well for one we had two orders come out not cooked.  Why is that?  The grill stage got executed before the line stage.  That means when the line stage wrote, it overwrote the result of the grill stage.  When the expediter came along, they only found non grilled ingredients but proceeded with mixing anyways.  Everyone is mad now, including the executive chef.  Expect 1 start reviews on Yelp.  So WaW basically means that the order of writes gets swapped and the final reader gets a different result than expected.  

So let's now break down vkCmdPipelineBarrier as though we were applying it to our kitchen.  ( Using a recently launched Vulkan Kitchen API ).

	{
		// Fake VK Kitchen API
		VkCookingBarrier barrier = {};
		barrier.sType = VK_STRUCTURE_TYPE_COOKING_BARRIER;
		barrier.srcAccessMask = VK_ACCESS_WAITER_WRITE_BIT;
		barrier.dstAccessMask =  
			VK_ACCESS_PREP_READ_BIT |
			VK_ACCESS_PREP_WRITE_BIT |
			VK_ACCESS_LINE_READ_BIT |
			VK_ACCESS_LINE_WRITE_BIT |
			VK_ACCESS_EXPEDITE_READ_BIT |
			VK_ACCESS_EXPEDITE_WRITE_BIT;

		// VK_PIPELINE_STAGE_ALL_COMMANDS_BIT
		// 1.) VK_PIPELINE_STAGE_PREP_CHEF_BIT
		// 2.) VK_PIPELINE_STAGE_LINE_CHEF_BIT
		// 3.) VK_PIPELINE_STAGE_EXPEDITER_CHEF_BIT
		
		vkCmdPipelineBarrier( 
			vkcontext.commandBuffer[ vkcontext.currentBatch ], 
			VK_PIPELINE_STAGE_ALL_COMMANDS_BIT,
			VK_PIPELINE_STAGE_ALL_COMMANDS_BIT, 
			0, 1, &barrier, 0, NULL, 0, NULL );
	}

What this does is it guards each order so READS/WRITES stay consistent within a given order.  For example we say that as soon as the WAITER_WRITE_BIT is triggered we start guarding those operations through prep, line, and expediter READS/WRITES.  We guard them at each stage of the pipeline using PIPELINE_STAGE_ALL.  

Now is this optimal?  No.  As a matter of fact it's very heavy handed.  We're guaranteeing operations at every stage of the pipeline and we're not allowing orders to overlap.  Where would be a good place to optimize things?  As you may have noticed in all our examples, none of the hazards were caused in Prep.  This is because the results are always the same.  So we wouldn't need to guarantee READS/WRITES for this stage.  The kitchen could start on two orders simultaneously and then guarantee operations starting at the line stage.

This may seem rather complicated, and it is!  But unless you're doing something super sophisticated, you only need to understand it in a few places.  I've already pointed out where it's useful for images, and now I've pointed out where it's useful for memory.  The main purpose of this pipeline is to guard operations for each frame. There are only three places where VkNeo uses pipeline barriers.  And the final one we haven't covered is in post processing ( which is also related to image transitions ).  

So take heart.  The time to investigate this type of synchronization is warranted when you start seeing graphical glitches or odd crashes.  Be sure to check your validation layer output as well as it can be helpful in this regard.


Render A Frame

Here it is.  This is where the rubber meets the road.  Drawing.  In Part 4.5 we stopped at DrawElementsWithCounters.  Now we'll take the plunge.  Everything lead up to this.

 
/*
=============
idRenderBackend::DrawElementsWithCounters
=============
*/
void idRenderBackend::DrawElementsWithCounters( const drawSurf_t * surf ) {
	// Get the vertex buffer
	const vertCacheHandle_t vbHandle = surf->ambientCache;
	idVertexBuffer * vertexBuffer;
	if ( vertexCache.CacheIsStatic( vbHandle ) ) {
		vertexBuffer = &vertexCache.m_staticData.vertexBuffer;
	} else {
		const uint64 frameNum = (int)( vbHandle >> VERTCACHE_FRAME_SHIFT ) & VERTCACHE_FRAME_MASK;
		if ( frameNum != ( ( vertexCache.m_currentFrame - 1 ) & VERTCACHE_FRAME_MASK ) ) {
			idLib::Warning( "idRenderBackend::DrawElementsWithCounters, vertexBuffer == NULL" );
			return;
		}
		vertexBuffer = &vertexCache.m_frameData[ vertexCache.m_drawListNum ].vertexBuffer;
	}
	int vertOffset = (int)( vbHandle >> VERTCACHE_OFFSET_SHIFT ) & VERTCACHE_OFFSET_MASK;

	// Get the index buffer
	const vertCacheHandle_t ibHandle = surf->indexCache;
	idIndexBuffer * indexBuffer;
	if ( vertexCache.CacheIsStatic( ibHandle ) ) {
		indexBuffer = &vertexCache.m_staticData.indexBuffer;
	} else {
		const uint64 frameNum = (int)( ibHandle >> VERTCACHE_FRAME_SHIFT ) & VERTCACHE_FRAME_MASK;
		if ( frameNum != ( ( vertexCache.m_currentFrame - 1 ) & VERTCACHE_FRAME_MASK ) ) {
			idLib::Warning( "idRenderBackend::DrawElementsWithCounters, indexBuffer == NULL" );
			return;
		}
		indexBuffer = &vertexCache.m_frameData[ vertexCache.m_drawListNum ].indexBuffer;
	}

	// Calculate the index offset
	int indexOffset = (int)( ibHandle >> VERTCACHE_OFFSET_SHIFT ) & VERTCACHE_OFFSET_MASK;

	RENDERLOG_PRINTF( "Binding Buffers(%d): %p:%i %p:%i\n", surf->numIndexes, vertexBuffer, vertOffset, indexBuffer, indexOffset );

	// In Vulkan this is a graphics pipeline which we'll be going over in the next post.
	const renderProg_t & prog = renderProgManager.GetCurrentRenderProg();

	// Validate that the renderprog is prepared to handle a joint buffer if present.
	if ( surf->jointCache ) {
		assert( prog.usesJoints );
		if ( !prog.usesJoints ) {
			return;
		}
	} else {
		assert( !prog.usesJoints || prog.optionalSkinning );
		if ( prog.usesJoints && !prog.optionalSkinning ) {
			return;
		}
	}

	// Save off the joint handle so when we CommitCurrent below
	// it can bind this to the graphics pipeline.
	vkcontext.jointCacheHandle = surf->jointCache;

	// debug
	PrintState( m_glStateBits, vkcontext.stencilOperations );
	
	// This makes sure we've bound the proper graphics pipeline for drawing
	// this surface.  It also updates any data that the pipeline might use
	// in the process of executing.
	renderProgManager.CommitCurrent( m_glStateBits );

	{
		// Bind the index buffer
		const VkBuffer buffer = indexBuffer->GetAPIObject();
		const VkDeviceSize offset = indexBuffer->GetOffset();
		vkCmdBindIndexBuffer( 
			// Again supply the command buffer
			vkcontext.commandBuffer[ vkcontext.currentFrameData ], 
			// The actual vulkan buffer describing the index buffer resource.
			buffer, 
			// The offset into the vulkan buffer.
			offset, 
			// VkNeo uses 16 bit indices
			VK_INDEX_TYPE_UINT16 );
	}
	{
		// Bind the vertex buffer
		const VkBuffer buffer = vertexBuffer->GetAPIObject();
		const VkDeviceSize offset = vertexBuffer->GetOffset();
		vkCmdBindVertexBuffers( 
			// Again supply the command buffer
			vkcontext.commandBuffer[ vkcontext.currentFrameData ], 
			// First binding, number of bindings
			0, 1, 
			// The actual vulkan buffer describing the vertex buffer resource.
			&buffer, 
			// The offset into the vulkan buffer.
			&offset );
	}

	// Draw Draw Draw
	vkCmdDrawIndexed( 
		// The command buffer
		vkcontext.commandBuffer[ vkcontext.currentFrameData ], 
		// Number of indices
		surf->numIndexes, 
		// Number of instances
		1, 
		// First index to use
		( indexOffset >> 1 ), 
		// Vertex offset
		vertOffset / sizeof( idDrawVert ), 
		// First instance
		0 );
}
 

A bit underwhelming right?  Just like all things Vulkan, the effort is front loaded so the actual workload is minimum.  So let's reiterate the steps in non technical terms.

  1. Get the portion of the vertex buffer that contains the surface we want to draw.  
  2. Get the portion of the index buffer that contains the indices into the vertex buffer.
  3. Get the index offset we start at.
  4. Validate that our current graphics pipeline can bind a joint buffer if there is one.
  5. Save off the joint buffer handle.
  6. Commit the current graphics pipeline state ( covered in next article ).
  7. Bind index buffer
  8. Bind vertex buffer
  9. Draw indexed

There's only one other place in VkNeo that issues draw calls and that is in drawing the stencil shadow pass.  But we won't cover that in this post.  To accentuate the simplicity of this section of code I shall now move on.  


End A Frame

We've done it!  We wrote a frame.  We stopped at a kitchen and got the wrong order too.  ( I haven't been playing overcooked, no way.  )  All that's left is to wrap things up and send it off to the GPU.  Let's take care of that now.

 
/*
==================
idRenderBackend::GL_EndFrame
==================
*/
void idRenderBackend::GL_EndFrame() {
	// Close the renderpass
	vkCmdEndRenderPass( vkcontext.commandBuffer[ vkcontext.currentFrameData ] );

	// Close the command buffer we recorded the frame to
	ID_VK_CHECK( vkEndCommandBuffer( vkcontext.commandBuffer[ vkcontext.currentFrameData ] ) )
	vkcontext.commandBufferRecorded[ vkcontext.currentFrameData ] = true;

	// Break out the semphores.  We'll need them soon.
	VkSemaphore * acquire = &vkcontext.acquireSemaphores[ vkcontext.currentFrameData ];
	VkSemaphore * finished = &vkcontext.renderCompleteSemaphores[ vkcontext.currentFrameData ];

	VkPipelineStageFlags dstStageMask = VK_PIPELINE_STAGE_BOTTOM_OF_PIPE_BIT;

	// The info we'll be submitting to the GPU.
	VkSubmitInfo submitInfo = {};
	submitInfo.sType = VK_STRUCTURE_TYPE_SUBMIT_INFO;
	// We're only submitting the one command buffer we recorded the frame to.
	submitInfo.commandBufferCount = 1;
	submitInfo.pCommandBuffers = &vkcontext.commandBuffer[ vkcontext.currentFrameData ];
	// Don't start on the work, unless we have the image to render to.
	submitInfo.waitSemaphoreCount = 1;
	submitInfo.pWaitSemaphores = acquire;
	// When we're done with the work, signal this semaphore.
	submitInfo.signalSemaphoreCount = 1;
	submitInfo.pSignalSemaphores = finished;
	// At what stage of the pipeline the semaphore will wait at.
	submitInfo.pWaitDstStageMask = &dstStageMask;

	// Submit the work
	ID_VK_CHECK( vkQueueSubmit( 
		// Submit to the graphics queue
		vkcontext.graphicsQueue, 
		// Only one submission
		1, &submitInfo, 
		// Save a fence we can use for synchronizing later
		vkcontext.commandBufferFences[ vkcontext.currentFrameData ] ) );
}
 

Again straight forward.  Now the GPU is busy producing our frame.  Oh wait, how do we present it!  

Swap Buffers & Present

maxresdefault.jpg

We have one last thing to do, and that's show off our handy work.  Here's how we go about that.

 
/*
====================
idRenderBackend::BlockingSwapBuffers
====================
*/
void idRenderBackend::BlockingSwapBuffers() {
	RENDERLOG_PRINTF( "***************** BlockingSwapBuffers *****************\n\n\n" );

	// Don't swap unless a buffer was recorded and submitted
	if ( vkcontext.commandBufferRecorded[ vkcontext.currentFrameData ] == false ) {
		return;
	}	

	// Wait for the fence we acquired when submitting to the graphics queue.
	ID_VK_CHECK( vkWaitForFences( vkcontext.device, 1, &vkcontext.commandBufferFences[ vkcontext.currentFrameData ], VK_TRUE, UINT64_MAX ) );

	// Reset the fence
	ID_VK_CHECK( vkResetFences( vkcontext.device, 1, &vkcontext.commandBufferFences[ vkcontext.currentFrameData ] ) );
	vkcontext.commandBufferRecorded[ vkcontext.currentFrameData ] = false;
		
	// Get the render finished semaphore
	VkSemaphore * finished = &vkcontext.renderCompleteSemaphores[ vkcontext.currentFrameData ];

	// Fill out our present struct
	VkPresentInfoKHR presentInfo = {};
	presentInfo.sType = VK_STRUCTURE_TYPE_PRESENT_INFO_KHR;
	// Wait for the command buffer to be finished
	presentInfo.waitSemaphoreCount = 1;
	presentInfo.pWaitSemaphores = finished;
	// We only have one swapchain
	presentInfo.swapchainCount = 1;
	presentInfo.pSwapchains = &vkcontext.swapchain;
	// We're presenting the image we acquired when starting the frame.
	presentInfo.pImageIndices = &vkcontext.currentSwapIndex;

	// Present the image.
	ID_VK_CHECK( vkQueuePresentKHR( vkcontext.presentQueue, &presentInfo ) );

	// Increment the frame data
	vkcontext.counter++;
	vkcontext.currentFrameData = vkcontext.counter % NUM_FRAME_DATA;
}
 

BOOM!  It's all coming together isn't it?  We only have one major topic to cover before we start getting into the weeds.  Next up we'll dissect idRenderProgManager and see just what it's been hiding this whole time.  And believe me, it's more important and far more fascinating than this post here.  That's because we'll be looking at how we actually control the graphics pipeline itself.  We'll be knee deep in the GPU.  Stay tuned.  Oh and Pixels are served.

I Am Graphics And So Can You :: Part 6 :: Pipelines

I Am Graphics And So Can You :: Part 6 :: Pipelines

I Am Graphics And So Can You :: Part 4.5 :: idTech

I Am Graphics And So Can You :: Part 4.5 :: idTech